“In Production” is a brand new video chat program where hosts I and long time friend and friend Carey Dissmore discuss tools and topics related to the video production business. I think we both have a unique perspectives as independent production business owner/operators. We aren’t just here to talk about stuff in a generic review sort of way, but to share insights on using those tools in the real world. Does this thing _really_ work work better, does it make you money faster & easier ? Can you use this with a client in the room ?
This show will be produced periodically as series around specific topics. Our first series is on the topic of Color Grading and DaVinci Resolve. This series is comprised of 6 episodes, to be released weekly. The first two episodes are embedded below.
We hope you like this show and, as always, welcome your comments.
Finally here ! Anyway this is a look at the lens I use for a major portion of my shooting, especially interviews. I graded this in DaVinci Resolve which was a real pleasure. In fact this was one of my learning projects for Resolve which is part of why it took me so long. I was learning, making a few mistakes along the way, and then, suddenly, it was done 🙂 !
It seems that Tokina released the 35-105 3.5 they made for Vivitar once Vivitar went on to a model II which was 3.2-4. Here is a sample of the Tokina 35-105 ( mislabeled in the video BTW ) which looks pretty nice. These shots have been “graded” so its hard to say what the real look of the lens is, but according to the author its sharper wide open then the original lens.
More investigation shows there are at least 2 models. The RMC version is different from the generic Tokina which appears to be the same as the Vivitar version.
What started out as a simple question has become a more complicated answer. There are a lot of people out there saying “Just Shoot Flat” on the web. In what is now the first part of this series of tests, I’ll say yes. In high contrast situations like snow in sunlight, by all means turn down the contrast control. In taking a look at the 60D’s dynamic range I had a question thrown at me – am I looking at a NLE / software scope or hardware scope in judging whats going on ? I have both so I put them to the test.
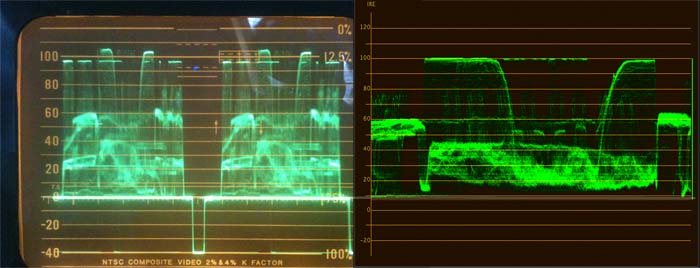
Let me explain and show you something interesting. In the first part I talked about if 100 IRE = 235 or 255. On the scopes in my NLE, the codec was clearly clipping at 100 IRE, there was nothing above. If I plug the 60D’s composite out into my Tektronix scope there is a surprise, over brights ! In the image below you can see that I’ve got whites hitting about 105 IRE. I could not get anything hotter then that from the camera. The flat top areas at about 97 IRE are in fact the onscreen text overlays. So in response to the poster, yes the camera puts out hotter then 100 IRE on its video outs, but the codec which you actually record to ins’t giving it to you. In a word, that sucks, Canon, H264 has more to offer then what you have limited us to. Let us have everything the spec can handle : 10 bit 4:2:2 or 4:4:4.
Part 3
Good science means you can repeat the results. Today I ran the HDMI out of my 60D into a MXO2 and used Matrox’s Vetura capture software to grab the video output to ProRes 1080. That worked as expected and I grabbed a short clip, opening and closing the iris to get a range of exposure values. The shot was nothing special, just the MXO2 sitting on my desk.
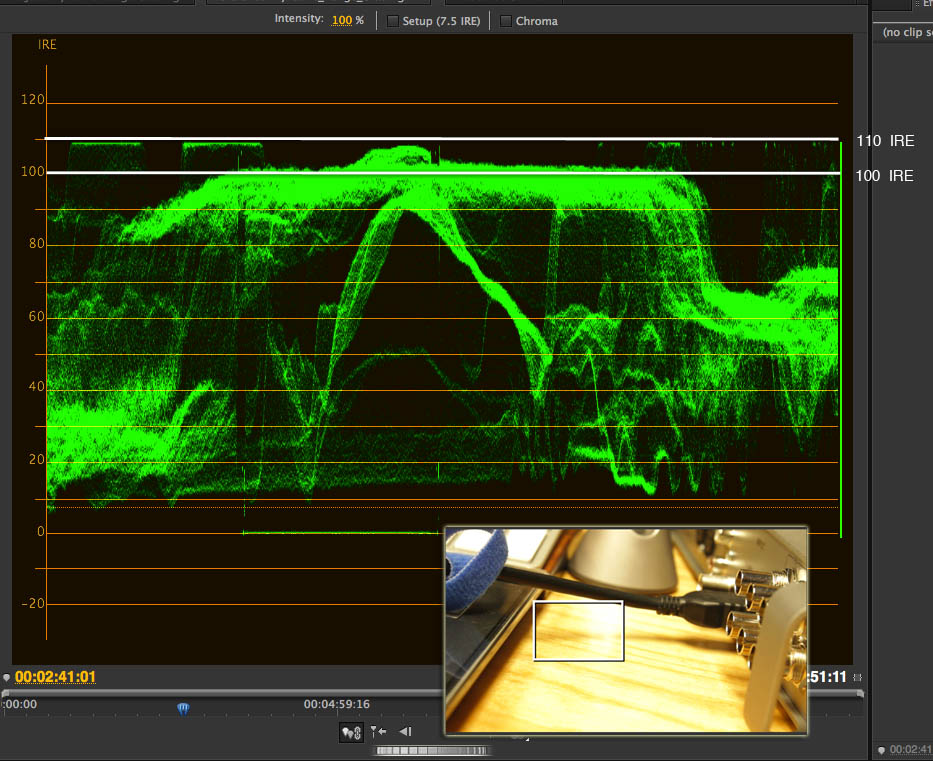
In this shot which looks about right for exposure the scopes show something very interesting, I’ve got whites at 109 IRE! However, the clip from the camera is only 100 IRE, hard clipped.
With this info in hand, I’m going to try to dig up a chip chart and run some tests to see if the camera is compressing its hot signal down to 100 IRE compressing the range, but still retaining highlights values, or if the codec is simply hard clipping everything over 100 IRE out. If the codec is hard clipping information, that means using the camera’s video out for monitoring even with a scope is not accurate. You can see it on the monitor, but not record it to the card. This would be seriously troubling if it proves to be the case which I am suspecting will be true.
Part 4
What started out as a pretty simple series of tests got a lot more complicated. I completed another round of tests using a simple chip chart. Now I need to make one disclaimer here, the chip chart I got my hands on was not a great one. It wasn’t one of those expensive official 10 stop charts, but rather a printed one that came with an old copy of On Location. Before you all get excited about this, please consider what I needed for these tests : a way to generate some cleanly stepped values for highlights. In this purpose you’ll see the chart did just fine. It also let me look at some other more interesting things that the camera is doing, especially comparing the output of the hardware scopes to what the codec records.
A big question here is, what happens when video out is over 100 IRE – is the codec clipping ? Initial tests indicated it was, but in this series of images, it appears that the camera is actually processing the image data down to generally fit into the range of 0-235 / 100 IRE max. It seems to be compressing the top end down to preserve whats in the image.
This does however bring up more problems : the camera’s video out is not an absolutely accurate way of knowing whats really being recorded ! This completely and totally flies against everything any video camera has ever done. What comes out of video out should be exactly the same as what is recorded ! Now while it appears that the camera is in fact preserving all the image data you see on video out, it means that any sort of monitoring from the camera is simply inaccurate. You can not use scopes to setup the camera, or to try to match them the way you would a conventional video camera. This even means that an expensive several thousand dollar video monitor is something of waste as it may not show you anything more then what a cheap one will. The fact is, a monitor introduces its own variables in terms of what it displays and how. It makes the me almost want the days of NTSC back where everything was far more standardized, repeatable and reliable. It seems in the era of new cheap HD digital everything, standards are out the window unless you want to spend serious money.
Each of the following images can be clicked on to see a full size image.
Take a look at how the camera sends out video, compared to how it records it. The first thing I want to say is, I’m shooting “flat” as per internet buzz about how you are supposed to shoot to get the most dynamic range from the camera.
In the very first screen shot, its clear that with contrast at min, the blacks are really elevated. Guess what ? I almost succeeded in getting 7 bits worth of gray value ! If you see my whites are at 90 IRE while my blacks are at 30 IRE, thats just 60 IRE worth of range, a 40% reduction of what just plain old composite video can carry, never mind our digital video formats.
Next I cranked up the exposure to see what is really going on with highlights. While the hardware scope shows a little small difference, back in the digital world two things have happened :
1. The over bright whites have been pushed down to 100 IRE.
2. The rest of the signal has also been compressed !
This means that no image data visible on video out has been per se lost, but is has been compressed down to less dynamic / bit range by the codec. I”m not saying this is so much bad, but not what any one expected.
Another exposure variation, not nearly as over exposed with distinct steps in the overbright area. The codec has safely brought them back into “legal” range. However, with contrast on min, black levels are at about 50%. Hey I may of just made 7 bit images with 8 bits to play with.
Another shot where I just cranked up the exposure, but still the codec has compressed the highlights.
Here I dialed the contrast back to mid level. I have shades that are starting to look like black. They are still too hot, but I’m getting better.
Finally I turned the contrast all the way UP ! I finally have real blacks, and I’m making the most of the color space. If you are shooting a flat scene, increasing contrast can well be a good thing. Yes this completely go against what some folks have been saying, which is to just shoot with reduced contrast all the time making for a “raw” style image. This isn’t RAW, not by any means. Creating images that look like them, but are actually only holding 7 bits of color vs RAW”s 12 is just wrong.
Same exposure, but contrast set to min, I have again reduced the usable range of gradation.
So what does this mean ? it comes back to what the old school camera guys have said all along “Get it right in camera ! ” Seriously, reducing contrast and shooting flat buys you nothing except less gradation and less dynamic range in the recorded image. Sure you can color correct the image back so that blacks are black, whites are white, but with a lot of missing image data when doing so. What shooting flat does do is buy you some fudge factor – its less likely to under expose or over expose your image. Sure that works when you really have no idea how the camera handles and you have no idea where your monitor is in terms of telling you what you are getting. That doesn’t get yo the best image you can get recorded though.
Use the histograms if your camera has them. While you can’t totally trust them, they will let you know you are spreading out your exposure enough to make a gradable image in post that won’t cause too much cussing ! You’ll know if you are too dark or brite because of how it bunches up. Likewise, even if the histogram looks a bit hot, as long as it isn’t completely blown out the codec will squeeze it back into legal video range, even if you aren’t going to broadcast with it.
I hope this has gotten all of you thinking that you need to use your eyes, histogram and some experience to get the best image. Shooting flat isn’t the answer, its part of the problem and if you want to be a DP you need to learn your tool and medium.
It depends. In this high contrast example, a flat shooting setting will get you the most amount of dynamic range to be recorded with in the limits of the codec. However, in an upcoming test, I’ll show you how shooting flat won’t be the best thing.
Canon EOS 60D Dynamic Range Contrast Adjustment Test from Steve Oakley on Vimeo.
At first glance, lower contrast settings do indeed give you more image to work with. It really seems like the contrast adjustment is much more like a gamma plus pedestal adjustment. Adjusting contrast moves not just the low end of the picture but the mids around too.
My first couple of tests actually show a pretty large dynamic range, holding not only the sky and snow, but also well into the shadows. Technically, the image is underexposed since the whites aren’t quite white. However, I can live with that in seeing that the camera is really holding an enormous range of brightness. My hand held light meter bit the dust a few months ago, but after 20 years of service I’m not complaining. I don’t have a formal light range reading for you, but its easy to see this is at least 10 stops. Its easy to set up tests with charts and make certain claims, its quite another to make usable images, or see those specs in action where you can say you got information in a bright or dark area that you might not of with another camera.
For a finished shot it would be easy to grade this a bit and bring the snow up, and bring the sky down a bit.
Looking between the picture styles you can see differences in color rendition and dynamic range. While its probably not cool to say you use it, the standard setting actually holds up very well and better then some of the other picture styles.
Clearly the contrast setting is not just changing the dark areas, its much more of a gamma type adjustment. If you scope the images you can see this. Another interesting thing I saw was that the EOS codec hard clips at 100 IRE. Now if 255 = 100 IRE, I’m somewhat ok with this. However, if 235= 100 IRE, I’m not. In 8 bit color space you need every last step of range you can get. Why throw away 20 more steps in gradation, especially in the high end ? My JVC HD100 lets you shoot over brights to 110 IRE, and thats where I have the camera set. When you have to grade compressed 8bit material, every little bit counts. On the positive side, the codec does allow pure 0 IRE level blacks, adding 13 steps on the bottom end.
Now on the side of shooting lower saturation, I’m going to go against what some other folks are running around saying. There is no net benefit to reducing color saturation, but there is plenty to loose when shooting. Quite simply, if you reduce your saturation, you simply are using fewer bits to record gradation with. So instead of getting 8 bits, your reducing yourself to 7 bits, or even 6 bits. Don’t believe me ? Shoot some shots with a lot of color gradation in them in various settings. Then go into your NLE of choice, open up your scopes, and color correct that material to look likes its got a full range of color again. Out will pop missing steps of color. Thats right, those empty sections are exactly that, areas of no gradation. You are jumping from one color value to another several units away with nothing in between. So unless you are shooting material with very high saturation to begin with, where you may be clipping values to begin with, stay put in middle setting, or perhaps -1 if you really must. Dialing color down below that won’t net you anything except loss of color information thats already been reduce by the h264 compression. Now just to irk those turn down the saturation folks, the very first project I shot with my 550D had its saturation turned up to +1. That project won and award an had everyone buzzing about how great the images looked.
All right, just as another comparison, here is a 7D vs Alexa comparison. It seems to show the same thing I experienced – that the canon cameras don’t like over exposure and clip highlights pretty fast.
Alexa vs 7d latitude tests from Nick Paton ACS on Vimeo.