Apple APFS and Removing Drives From Your JBOD RAID
I did a bit of searching for if its possible to remove a failing drive from an Apple JBOD RAID. Its all theoretically possible. I’ll also admit having some ZFS envy. MacZFS turned out to be a bit of a bust in terms of usability. I couldn’t format a dataset volume that without error in Disk Utility and I wasn’t going to get into deep terminal work to make it work. Going back to Disk Utility and just messing around with a few drives formatting them in various way, I finally figured out how to remove a failing volume in a JBOD RAID.
First a few clarifications. You have to format the JBOD using OS X. If you did it via drive case firmware, this isn’t going to work because there is no access to the underlying utility or drive controller.
Another is that you need to have enough free space in the JBOD to hold whatever is on the drive you want to remove. If you want to remove a 6TB drive then you need at least 6TB of free space to do this successfully. Having a 5 to 10% margin of additional space would be a good idea for just in case things don’t fit down to the last few bytes. Workaround if you don’t is to add another drive to the JBOD to give it space to internally shuffle the data around in the next steps.
Cost of failure : you loose all your data on the JBOD if the operation fails. This is a rough one but I think Apple’s diskutil is still a work in progress in this area. It apparently does check the space situation but if you try this and it throw up a warning there isn’t enough space, I’d take that warning seriously.
Odd limitations :
- Disk Utility requires that there be at least 3 drives in the JBOD for this to work. If you have just 2 it won’t let you remove a volume. So you may need to add a drive just to remove the other one.
- Disk Utility only allows you to remove the last mounted drive in the JBOD set. I. know this seems weird since you really should be able to remove any volume except maybe the first one which holds the directory and other RAID metadata. There is a workaround.
Workaround: Figure out which way your drive case or dock is physically mounting the drives, top to bottom or bottom to top, left to right or right to left. How ? unmount the RAID, power down the case and remove a drive at the very top or bottom, right or left. Power the case up and see which drive is now reported missing in Disk Utility. If its the top most disk in the list, the drive on the other end is the last. Knowing this, unmount the drive although its probably not mounted right now, power it down. If you know the physical volume you want to remove due to say, SMART error or simply making noise, move it to what will be the last physical drive slot to mount. Fire everything up and it should mount.
Now one thing I have seen is that with JBODs if you don’t have the drives in the order they RAID was built, it might not mount. Put the drives back in with appropriate power and unmounting. Once it mounts again, power down and move the drive back. On second tries I’ve had this work with seeming random order of drives. In particular maybe the actual issue is getting the first drive of the set into the first slot to mount and then it doesn’t matter.
Once you have the drive you want to remove in the last physical slot to mount and have the RAID mounted.
- go to Disk Utility, Select the RAID set
- In the view of the volumes that are in the set, select the last one in the list which is presumably the drive you want to remove. If not, unmount, power down, swap drives and repeat until it is.
- If the selection is good, hit the Minus button on the bottom left of the window
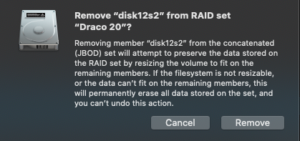
- A warning will come up about the operation may fail and you’ll loose everything if there isn’t enough free space, Click Remove
- Wait.
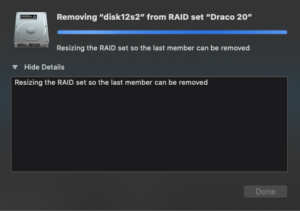
- Disk Utility will now copy any data from the drive to be removed back onto free space across the other drives. This may take quite a few hours depending on your case interface and drive speed plus how much data needs to actually be moved around. If you can use an eSATA or USB 3.1+ interface it’ll be a lot faster than USB2 which could take days. Unfortunately Disk Utility doesn’t provide any sort of progress bar, estimate to completion or any other indication how long it will take. You simply repeat step 5 until its done. Fair warning – don’t write anything to the RAID while this operation is going on. Given that things like large block sizes can inflate how much space small files eat up don’t start this operation unless you have a little margin on free space.
If all went well, you should till have your data and the drive you wanted to remove can now be physically removed from the case and everything works.
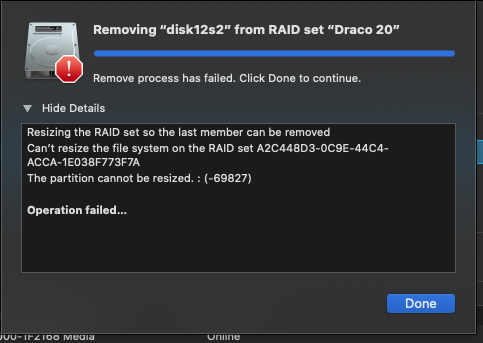
What if it didn’t go well ? That happened to me the first time where the operation ended after 8hrs of moving bits around. Disk Utility simply displayed “An error has occurred -69000 something”. DU also was beachballed requiring a force quit. I rebooted since DU was in a hopeless state.
Once I got back up, I opened up the array I was trying to trim the drive from. I decided, as a guess there wasn’t enough free space and that DU had already shuffled most of the data off the drive I wanted to remove. I found a project using 1.15tb of space and deleted it. I had 2 other copies of it and this was the headline restore version. It could go as could a few hundred gigs of other dead projects. I now how another 2tb of free space and decided to try again. Note : NO data loss despite DU’s dire warning there would be. My good fortune may not be yours, proceed with caution.
With more space free, I opened DU yet one more time. I set up the remove operation and went to bed. I have no idea how long it ran for, at least 20 mins. In the morning it was done, no error message. In fact DU said it was safe to remove the physical volume now. The JBOD I had removed the drive from showed the correct volume size. I had to reboot again because, well, I actually did remove the drive from the case and that caused DU to again beachball. Once restored, everything was good. I could now reuse the drive from the original array an move it into the new one. Yes folks, this does work with some tedious time and effort. You might need to decide if the time and risk is worth it versus just buying a new drive or several and copying everything over. That is of course assuming things are in working order. If this is a salvage operation, there isn’t any backup and you are trying to save the data this process might be worth while – add a new drive, mess around until the failing drive mounts last, then use DU to remove it from the set.